13.1 Collecting a soft certificate
You can collect a soft certificate request for yourself or for another person. You can save the certificates to your Personal certificate store, to a selected file location, or automatically to an attached USB device, depending on how the soft certificate credential profile is configured.
You can also print a transport document for the soft certificate request.
Important: Saving soft certificate packages and printing transport documents requires the MyID Client Service to be running.
To collect a soft certificate request:
-
Search for a request, and view its details.
See section 6.1, Searching for a request.
You can display the Type field from the Additional search criteria and select the Request a soft (browser) certificate for a user option from the drop-down list.
You can also view a request from any form that displays a link to the request.
For example:
- Click the entry in the list of requests in the REQUESTS tab of the View Person form.
- Click the entry in the list of requests in the DEVICE REQUESTS tab of the View Device form.
- View the screen that appears automatically after you have requested a device.
-
Click the Collect option in the button bar at the bottom of the screen.
You may have to click the ... option to see any additional available actions.
If this option is not available, the request cannot be collected; for example, it may require validation.
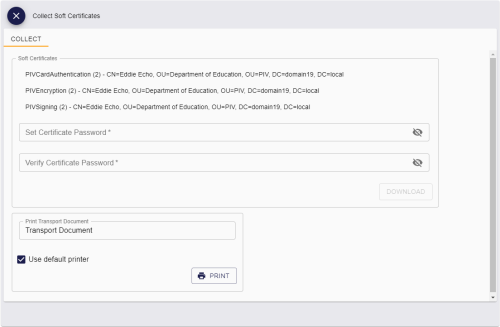
The Collect Soft Certificates screen appears.
-
If the credential profile requires a user-specified PIN, type the password in the Set Certificate Password and Verify Certificate Password fields.
Otherwise, MyID generates a password on the server for .pfx files. This password is not displayed on screen; you must set up a PIN mailing document to provide this password to the user.
Note: If there are multiple certificate files in the soft certificate package, they all use the same password.
-
Click Download.
The MyID Client Service must be running on your PC.
-
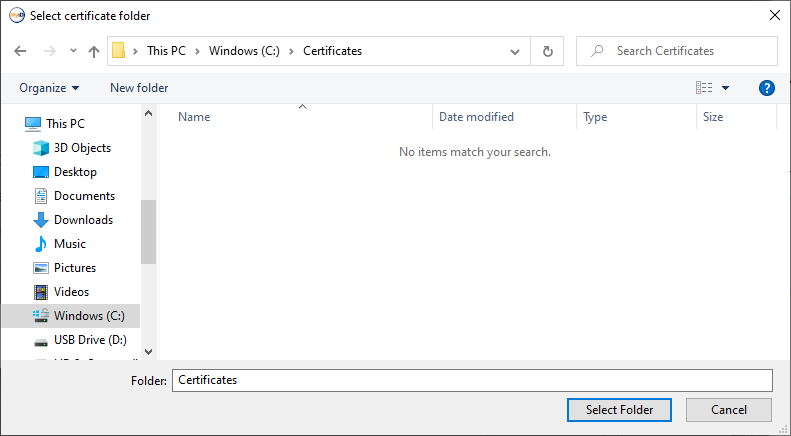
If a certificate policy is configured for FileStore, select the folder on your PC where you want to save the .pfx file.

Note: If the folder already contains a .pfx file with the same automatically-generated name, MyID overwrites the older file without warning.
-
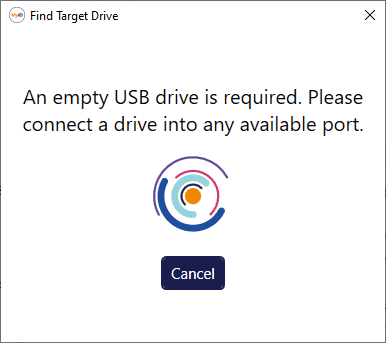
If a certificate policy is configured for AutoSave, MyID scans your PC for an empty USB drive.

Insert an empty USB drive into your PC. As soon as MyID detects an empty USB drive, it saves the .pfx file to that drive. If you have a USB drive attached that has files on it, and delete the files, MyID detects the newly-empty drive and saves the .pfx file.
-
If a certificate policy is configured for SystemStore, MyID saves it to the Personal store of the logged-on Windows user automatically.
Note: If you cancel the folder selection or the USB find dialog, MyID deletes any .pfx files it has already created, but any certificates written to the Personal certificate store are not removed. You can attempt to download the certificates again; MyID obtains new certificates. Any certificates that were not fully collected are revoked automatically a short time later.
The file names used for the certificate .pfx files are generated automatically. You can customize the format; see section 13.3, Customizing certificate file names.
-
-
If you have a transport document configured for the soft certificate package, click Print.
You can use transport documents to provide covering letters for the certificate package; for example, if you are distributing the certificate package on USB drives. Do not include the password in the transport document; you are recommended to provide the password in a PIN mailing document sent separately for security reasons.
Note: You cannot print a transport document until you have successfully downloaded the certificates.
For more information on transport documents and PIN mailing documents, see section 13.2, Printing mailing documents for a soft certificate package.
-
Once you have downloaded the certificates, and printed the transport document if required, click Close.


13.1.1 Known issues
-
IKB-372 – Error occurs on collection of software certificates when invalid characters are in the file name
Collection of software certificates has been seen to fail in some circumstances where the certificate policy name includes characters that are not compatible with the file name used to save the certificate onto the computer or connected USB drive. This may result in errors including OC10021 or OC10026.
To work around this issue, you can amend the certificate policy name, or customize the file name format for the policy that is causing issues; see section 13.3.1, File name formats for individual certificate policies for details.
If this issue persists, or for further support, contact Intercede customer support quoting IKB-372.